Twitter Api,FaceBook Api , Cognitive Services

Exploring Twitter Api, Facebook Api, Cognitive services etc.

Hello Everyone, Today we are exploring twitter api , facebook api , cognitive services and many more and then in later blogs will show you benefits of all these analysis. So let’s start with twitter api, we are using postman for the same.Postman is a chrome app so first step to download chrome then add postman.

img21

Twitter api with postman

Step 1. Login into your twitter account and open https://apps.twitter.com/ . click create new app button which opens application form detail page.

img22

Enter details here and click on create your twitter application.After doing so your twitter app will be created. In my case my app name is Gaurav121, see below  image

img23

Step 2. Open postman, inside your Authorization tab select oAuth1.0 ,then copy your consumer key,cosumer secret ,token and token secret from your twitter app and paste here . enter your api url , set content type to application/x-www-form-urlencoded in header tab.img24.png

Url is https://api.twitter.com/1.1/search/tweets.json?q=%40narendramodi , this is for fetching all the latest tweets by Mr. Narendra modi. Now click on Send button and your response is

img25

Now, you have a list of tweets by Mr. Narendra Modi.

Cognitive Services with Postman

Here we are exploring the text analytics api of cognitive services.From Official site of Cognitive services :

Microsoft Cognitive Services let you build apps with powerful algorithms using just a few lines of code. They work across devices and platforms such as iOS, Android, and Windows, keep improving, and are easy to set up.

Cognitive services icludes api like text analytics,emotion,face etc as shown below.

img26.PNG

 Login on cognitive services from https://www.microsoft.com/cognitive-services/en-us/apis and get a subscription key.

Open Postman and enter following details

Request URL : https://westus.api.cognitive.microsoft.com/text/analytics/v2.0/sentiment

Header Attribute : 

Ocp-Apim-Subscription-Key: <your API key>

Content-Type: application/json

Accept: application/json

Request type : POST

Body :

{
“documents”: [
{
“language”: “en”,  –> your language
“id”: “1”,
“text”: “I am Sad”  –> Your Sentence
}
]
}

img27

Now Press Send Button.

Output : 

img28

Here score is your main output.value varies between 0 to 1 and 1 is the perfect positive sentiment and 0 is perfect negative sentiment.

Facebook Api with Postman

For facebook , Use FaceBook Graph API.


Introduction to Django

What is Django?

Django is a free and open source web application framework written in Python that encourages rapid development and clean, pragmatic design. Django follows the model-view-template architectural pattern. Django offers a big collection of modules which you can use in your own projects. Primarily, frameworks exist to save developers a lot of wasted time and headaches and Django is no different.

From the official site ,

With Django, you can take Web applications from concept to launch in a matter of hours. Django takes care of much of the hassle of Web development, so you can focus on writing your app without needing to reinvent the wheel. It’s free and open source.

Ridiculously fast.

Django was designed to help developers take applications from concept to completion as quickly as possible.

Fully loaded.

Django includes dozens of extras you can use to handle common Web development tasks. Django takes care of user authentication, content administration, site maps, RSS feeds, and many more tasks — right out of the box.

Reassuringly secure.

Django takes security seriously and helps developers avoid many common security mistakes, such as SQL injection, cross-site scripting, cross-site request forgery and clickjacking. Its user authentication system provides a secure way to manage user accounts and passwords.

Exceedingly scalable.

Some of the busiest sites on the planet use Django’s ability to quickly and flexibly scale to meet the heaviest traffic demands.

Incredibly versatile.

Companies, organizations and governments have used Django to build all sorts of things — from content management systems to social networks to scientific computing platforms.

Now , Next thing is installation of Django

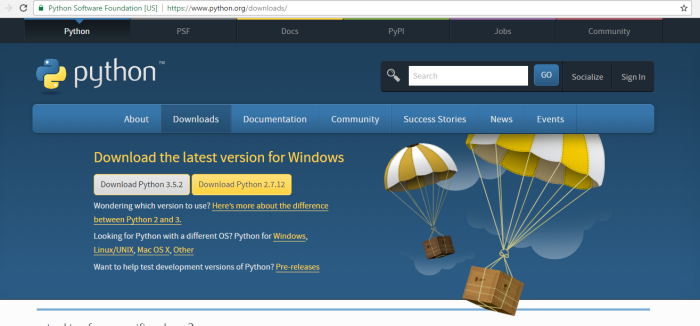
Step 1. Install python

Download it from https://www.python.org/downloads/ , See at below pic

img1

Step 2. Set Environmental variable

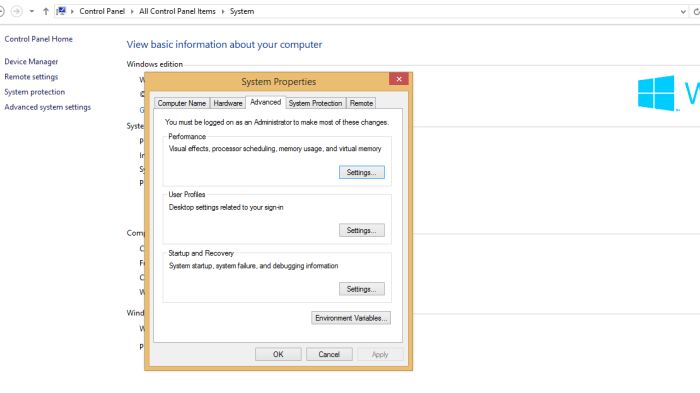
Open system properties from controlpanel > System > Advance system settings , you can set here environment variables

img4

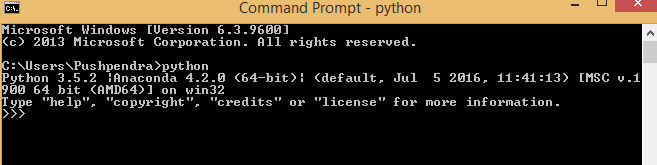
click Environment Variables ,Select path variable and then click on Edit button . Now here we set path for python by entering 3 values first one is path of your python folder , in my case it is C:\Program Files\Python35. Next value is path of python.exe  C:\Program Files\Python35\python.exe. Now you can check it from cmd prompt . Open cmd prompt and type python then press enter key.

img5

Here you can see the version of installed python software in your PC.Since python software is working now  you can work on the same but our main objective is to install django so we have to set some more environment variable . Next value of Path variable is C:\Program Files\Python35\Scripts\  and C:\Program Files\Python35\Lib\site-packages\django\bin. Each value is separated by “;”.

Step 3. Install pip(python installer package)

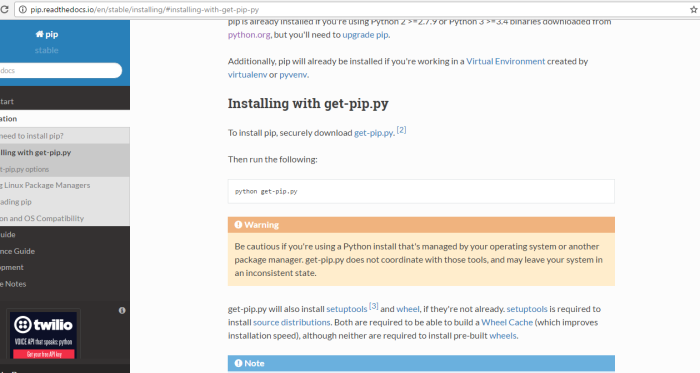
Download it from http://pip.readthedocs.io/en/stable/installing/#installing-with-get-pip-py. 

img2

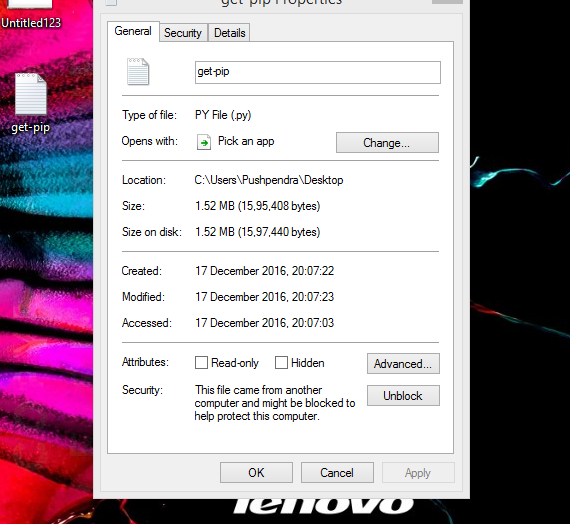
Here you can see get-pip.py link , right click on this link and click save link as and then save it on a location let us assume that we stored it in desktop.Now right click on downloaded pip file and select properties , following popup will come where you can check opens with .

img3

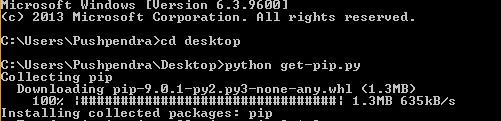
If opens with is not python then change it to python. Now open a cmd prompt and moved into desktop location since our pip file is there the enter command Python get-pip.py and press enter key

img6

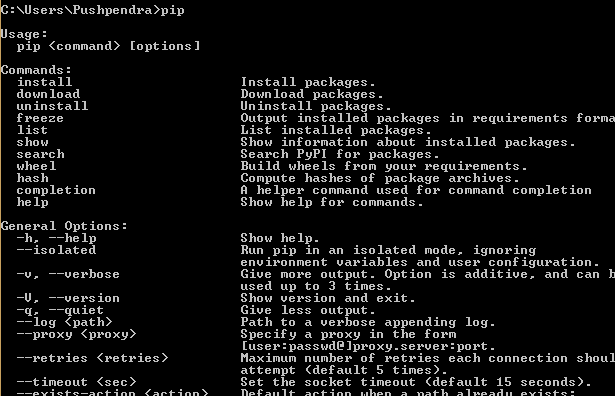
Now pip is installed in your PC , you can check it by command PIP just enter pip command press enter you can see some pip stuff as shown below

img7

Step 5. Set virual environment

open cmd prompt ,type PIP freeze press enter then type pip install virtualenv and press enter.Now virtual environment is installed in your PC , Next step is to create a virtual environment and for doing so, type  virtualenv venv command.

img8

it create a folder with name venv in your desktop. Now next thing is to activate virtual environment and for doing so move inside venv folder and type .\Scripts\activate

img9

it actiavtes your virtual environment and now from this virtual environment enter pip install django which will installed your django software.

Thanks

MongoDb Tutorial – Part 1

MongoDB is a cross-platform, document oriented database that provides, high performance, high availability, and easy scalability. MongoDB works on concept of collection and document.. Classified as a NoSQL database program, MongoDB uses JSON-like documents with schemas. MongoDB is written in C++.

MongoDB uses dynamic schemas, meaning that you can create records without first defining the structure, such as the fields or the types of their values. You can change the structure of records (which we call documents) simply by adding new fields or deleting existing ones. This data model give you the ability to represent hierarchical relationships, to store arrays, and other more complex structures easily. Documents in a collection need not have an identical set of fields and denormalization of data is common. MongoDB was also designed with high availability and scalability in mind, and includes out-of-the-box replication and auto-sharding.

Now , we have a question. why mongodb? So there are 5 main points –> 1. Open Source 2. Replication 3. Sharding 4. Schemaless 5. Cloud, Big Data.                                                                                                                           All the modern applications require big data, fast features development, flexible deployment and the older database systems not enough competent, so the MongoDB was obviously needed.

Installation of MongoDB

Step 1. Download mongodb for window 7 – 32 bit(folder structure – C:\Program Files\MongoDB\Server\3.4\bin)

Step2. Open cmd prompt and execute below command

C:\Program Files\MongoDB\Server\3.4\bin >mongod.exe –dbpath “Your Path”pic2

If you are getting “28663 Cannot start server. The default storage engine ‘wiredTiger’ is not av ailable with this build of mongod. Please specify a different storage engine exp licitly, e.g. –storageEngine=mmapv1., terminating”  error then execute

C:\Program Files\MongoDB\Server\3.4\bin>mongod –storageEngine=mmapv1 –dbpath “Your Path”.

pic1

This will show waiting for connections message on the console output, which indicates that the mongod.exe process is running successfully.

pic3

Now final step to run mongo db, open new command prompt and then execute

C:\Program Files\MongoDB\Server\3.4\bin>mongo.exe.

pic4

output will be like

pic5

Now your mongo db is up and running but please note down For 32-bit versions , MongoDB only support databases smaller than 2GB and suitable only for testing and evaluation purposes.

Introduction to Asp.net5-MVC6

Hello Everyone, How are you ?. Today we are going to understand what is Asp.net5 and how it is different from previous versions.There are lots of changes introduced in MVC6.

Currently, MVC6 = next version of MVC5,Web API2 and web pages2.Now comes into each features

Remove System.web namespace

All of us know that WebAPI is the framework for Rest web services so easily accessible and previous versions of MVC is tied with system.web namespace so with IIS web server.Microsoft removed the dependency of System.Web.Dll from MVC6 because it’s so expensive that typically it consume 30k of memory per request and response, whereas now MVC 6 only requires 2k of memory per request and the response is a very small memory consumption. Now, because neither MVC or WebAPI useSystem.Web, they two frameworks can be unified. There is now one framework, MVC6 which does both GUI and API.

Web API controller relied on System, .Web.Http.ApiController base class, MVC controller used the System.web.MVC.Controller base class. In MVC 6, these have been merged and there is just one controller for both of them – Microsoft.AspNet.Mvc.Controller class.

Environment based configuration system

Environments, like “Development” and “Production”, are a first-class notion in ASP.NET Core and can be set using environment variables.This allows specific code to only run in specific environments.

<head> 
  <meta name="viewport" content="width=device-width" /> 
  <title>Untitled Page</title> 
  <environment names="Development"> 
    <link asp-href="~/css/*.css" rel="stylesheet" /> 
  </environment> 
  <environment names="Staging,Production"> 
    <link href="/css/stylesheet.min.css" rel="stylesheet" /> 
  </environment>

Value of Environment setting can be specified in your project’s debug profiles. See Working with Multiple Environments for more information.

Roslyn Compiler

Asp.net uses the Roslyn compiler to compile code dynamically. Hence you will be able to edit a code file and can see the changes by refreshing the browser; without stopping or rebuilding the project.

Cloud optimized

Since MVC 6  is part of the ASP.NET 5 ,which has been designed for cloud optimized applications ,the runtime automatically  picks the correct version of the library when our MVC application is deployed to the cloud.

Deployment

There are two main ways to deploy your app: framework-dependent deployment or self-contained deployment. With framework-dependent deployment, only your app and third-party dependencies are installed and your app depends on a system-wide version of .NET Core to be present. With self-contained deployment, the .NET Core version used to build your application is also deployed along with your app and third-party dependencies and can run side-by-side with other versions.

Modular

.NET Core is modular because it is released through NuGet in smaller assembly packages. Rather than one large assembly that contains most of the core functionality, .NET Core is made available as smaller feature-centric packages. This enables a more agile development model for us and allows you to optimize your app to include just the NuGet packages you need.

Other features are Dependency Injection,supports OWIN,Can be run other hosts then IIS etc.,One of the big changes in ASP.NET 5 is that it doesn’t run on top of the old ASP.NET pipeline that consists of HTTPHandlers and HTTPModules .It runs on top of a new composable pipeline in which we can add middleware components.

Bot Framework


Prerequisites:

  • Install perquisite software:Visual studio 2015(latest update)-you can download the community version for free from :www.visualstudio.com
  • Download and install te Bot application template from the direct download link here
  • Save the zip file to your visual studio 2015 templates directory which is traditionally in

“%USERPROFILE%\Documents\Visual Studio 2015\Templates\ProjectTemplates\Visual C#\”

Developing Bot using C#:

Open Visual Studio.Create a new C# project using the new Bot Application Template.

1.png

Click MessageController.cs inside controller folder.Here you can see thebasic c# code provided by bot template.You can change it according to your need. After that you can run the Bot by clicking the brower label  below the menu on the top.You will get a window like below window when your bot will be up and running.

2.png

Testing your bot:

  • You can download the bot emulator from:Download Link
  • Inside Bot emulator set Bot URL to URL where your Bot is running.

3

Publishing your Bot

To publish the bot on Azure you can simply rigt click your bot project in visual studio and click publish.

4.png

Then choose Microsoft Azure apps, Create your profile and click publish.

5.png

Registring the Bot

The next step after creating the bot is to register it with bot connector using developer portal.

Toregister your Bot gohere.You need to have a microsoft-id to login here.

6.png

While registering do consider two main points:

  • In the Messaging end point provide the url you have created while publishing the bot on azure and append it with /api/messages.
  • Also, the Microsoft app-id and Password which you will generate here have to be entered in the web config of your bot.

 7.png

Connecting the Bot to other applications like Skype ,slack,email etc :

Go to My Bots tab on Bot Websitehttps://dev.botframework.com/Click your bot which has already been registered. After that you will get a window like this:

8

Here you can connect your Bot to any channel by clicking add link given on right side of every channel.

Introduction to .net core

ASP.NET Core is a lean and composable framework for building web and cloud applications. ASP.NET Core is fully open source and available on GitHub. ASP.NET Core is available on Windows, Mac, and Linux.

Prerequisites for .net core

.NET Core development on Windows with Visual Studio requires:

  • A supported version of the Windows client or operating system.
  • Visual Studio 2015 Update 3.3 or later
  • NuGet Manager extension for Visual Studio
  • .NET Core Tooling Preview 2

Supported Windows versions

.NET Core is supported by the following versions of Windows:

  • Windows 7 SP1
  • Windows 8.1
  • Windows 10
  • Windows Server 2008 R2 SP1 (Full Server or Server Core)
  • Windows Server 2012 SP1 (Full Server or Server Core)
  • Windows Server 2012 R2 SP1 (Full Server or Server Core)
  • Windows Server 2016 (Full Server, Server Core or Nano Server)

You can see the full set of supported operating systems in the .NET Core Release Notes.

.NET Core dependencies

.NET Core requires the VC++ Redistributable when running on Windows. It is installed for you by the .NET Core installer. You need to install the Visual C++ redistributable manually if you are installing .NET Core via the installer script (dotnet-install.ps1).

The Visual C++ Redistributable version differs by Windows version.

Visual Studio

You need Visual Studio 2015 to develop .NET Core apps. You can download Visual Studio Community 2015 for free.

Verify that you’re running Visual Studio 2015 Update 3.3:

  • On the Help menu, choose About Microsoft Visual Studio.
  • In the About Microsoft Visual Studio dialog, the version number should be 14.0.25424.00 or higher, and include “Update 3”.
  • If you don’t have Update 3, you first need to download and install Visual Studio 2015 Update 3.
  • If you have Update 3 but the version number is smaller than 14.0.25424.00, you need to download and install Visual Studio 2015 Update 3.3.

You can read more about the changes in Update 3 in the release notes.

NuGet Manager extension for Visual Studio

NuGet is the package manager for the Microsoft development platform including .NET Core. You need NuGet 3.5.0 or higher to build .NET Core apps.

.NET Core tools for Visual Studio 2015

Download and install the .NET Core 1.0.1 – VS 2015 Tooling Preview 2.

The .NET Core Tooling package installs .NET Core, project templates and other tools for Visual Studio 2015.

Introduction to Angular 2.0

This tutorial includes setup of angular 2 environment and basic introduction of angular2.

Setup Angular2 in Your Computer

Steps for angular2 development environment :

For more details Please refer angular site .

The main actor of angular2 are :-

Module,Component,Metadata,Template,Data Binding, Service,Directive,Dependency Injection.

Moduleit implies grouping of similar type of task or you can say code of block for single purpose.let’s take a practical scenario :  

suppose your typescript file is scenario.ts which contains some code like                        export class ScenarioComponent{}  => the export statement tells typescript that this is a module whose ScenarioComponent class is public and accessible to other modules of the application.

Now suppose you want to add a reference for the same then

import { scenarioComponent } from './Scenerio';

you can call it local modules or user defined modules. There are some predefined modules like

import { Component } from '@angular/core';

There are other important Angular library modules too such as @angular/common, @angular/router, and@angular/http.

The key take-aways are:

  • Angular apps are composed of modules.
  • Modules export things — classes, function, values — that other modules import.
  • We prefer to write our application as a collection of modules, each module exporting one thing.

Component and Metadata: Very basic syntax of Component  is

import { Component } from 'angular2/core';

@Component({
    templateUrl: '/Home/Contact'
})
export class ContactComponent {

}

Here @Component section is a decorator which  identifies the class immediately below it as a Component class.

The @Component function takes the configuration object and turns it into metadata that it attaches to the component class definition. Angular discovers this metadata at runtime and thus knows how to do “the right thing”.

The template, metadata, and component together describe the view.

Template A template is a form of HTML that tells Angular how to render the Component.

Data Binding:   type of data binding are

{{}} –> value  e.g.–> {{val}}, output –> 4 (val = 4).

[property] =”value”. e.g. –> [state]=”selectedstate”.

(event) = “handler”. e.g. –> (click)=“selectState(state)”.

and two way data binding means [(ngModel)]=”state.capital”.

Directive

There are 3 kinds of directive :

  1. Components
  2. Structural directives
  3. Attribute directives

A Component is really a directive with a template. It’s the most common of the three directives and we tend to write lots of them as we build applications.

Structural Directives can change the DOM layout by adding and removing DOM elements. Ngfor and NgIf are two familiar examples.

An Attribute directive can change the appearance or behavior of an element. The built-in NgStyle directive, for example, can change several element styles at the same time.

Service: 

why we need services,Multiple components will need access to some data and we don’t want to copy and paste the same code over and over. Instead, we’ll create a single reusable data service and learn to inject it in the components that need it.

In simple words, A service is typically a class with a  well-defined purpose.

Dependency Injection:

The DI in Angular 2 basically consists of three things:

  • Injector – The injector object that exposes APIs to us to create instances of dependencies.
  • Provider – A provider is like a recipe that tells the injector how to create an instance of a dependency. A provider takes a token and maps that to a factory function that creates an object.
  • Dependency – A dependency is the type of which an object should be created.

Promises in Angular JS

What is promises ?

In jquery ,.promise() method returns a dynamically generated Promise that is resolved once all actions of a certain type bound to the collection, queued or not, have ended.

 you can use promises to specify what to do when an operation eventually succeeds or fails.

Promises in Jquery

let’s start with the concept of deferred in jquery.For all deferred objects please refer deferred-object . Deferred objects in jQuery represents a unit of work that will be completed asynchronously. Once the unit of work is complete, the deferred object can be set to resolved or failed. A deferred object contains a promise object. With the promise object you can specify what is to happen when the unit of work completes by setting callback functions.

without deferred :

code1.0

calling the demoasync () function with a callback would look like this:

code1.1

with deferred :

code1.2

Now splits all the above steps

  1. jquery function $.Deferred() is used to create a deferred object. The deferred object does not do anything by itself. It is just a representation of some asynchronous work.
  2. a function is passed to the setTimeout() function. This function gets executed after a delay. The function calls deferredObject.resolve(). This causes the internal state of the deferred object to change to resolved (after the delay).
  3. the promise object associated with the deferred object is returned. Through the promise object the code calling the demosync2() function can decide what should happen if the deferred object’s state changes to resolved or failed.

Calling the demosync2() function would look like this,

code1.3

 You can see here callback function is not passed here as a parameter instead the callback function is passed to the .done() function on the promise object.

If the deferred object’s state changes to failed then the callback function passed to done() will not get executed. Instead the callback function passed to the promise object’s fail() function will get executed  like promise.fail(function(){…})

Now , summarize everything in an example

code1.4.png

Now, may be some people wants to know why we return promise object instead of  deferred object (since deferred object also has a done() and fail() function).The main difference between returning the deferred object and returning the promise object is that the deferred object can be used to set the resolved or failed state of the deferred object. You cannot do that on the promise object. So, if you do not want the user of your asynchronous function to be able to modify the state of the deferred object, it is better to not return the deferred object but only its promise object (deferredObject.promise()).

Promises in AngularJs

 Promises in AngularJS are provided by the built-in $q service. They provide a way to execute asynchronous functions in series by registering them with a promise object.Now again what is the role of deferred object in angularjs, answer is same as you read in jquery promises.A deferred object is simply an object that exposes a promise as well as the associated methods for resolving that promise. It is constructed using the $q.deferred() function and exposes three main methods: resolve(), reject(), and notify(). The associated promise object can be accessed via the promise property.

What is $q service?(from angularjs.org)

A service that helps you run functions asynchronously, and use their return values (or exceptions) when they are done processing.

function asyncdata(value) {
  var deferred = $q.defer();    ----> New instance of deferred is created

  setTimeout(function() {
/* resolve , reject and notify are method of deferred object */

    deferred.notify('About to data' + value+ '.');

    if (okTodata(value)) {
      deferred.resolve('Value is , ' + value+ '!');
    } else {
      deferred.reject('data ' + value+ ' is not allowed.');
    }
  }, 1000);

  return deferred.promise;  --> return promise object associated with deferred object
}

var promise = asyncdata('test data');
/* then,catch and finally are method of promise object  */
/* parameter of then method - successCallback, errorCallback, notifyCallback */
promise.then(function(data) {     -- successCallback
  alert('Success: ' + data);
}, function(reason) {             -- errorCallback
  alert('Failed: ' + reason);
}, function(update) {             -- notifyCallback
  alert('Got notification: ' + update);
});

 Definitely after reading all this , we have a question in our mind “$http already returns a promise then why we need $q?” .

The main issue is where you do the $http call. If your ultimate goal is to display the returned data, you’ll need to put it in a scope. So if you’re in a controller, and decide to execute the $http call there, then doing a $http.get().success().error() is fine, because you’ll have access to $scope from the controller.

But that’s not a good separation of concerns. So you have several options for what to do from a service, which is usually where you put data and non-visual methods that go against a backend. At least in Angular 1.x, promises are the way to go to separate the thing called from reporting the answer, and the promise (caller side) is your handle to getting results.

You can also say that, Promises are a replacement for Callbacks to help you deal with composition of multiple async operations while also making error handling simpler in some cases.